Three Advanced Yoga Poses
Yoga Offers Numerous Health Benefits
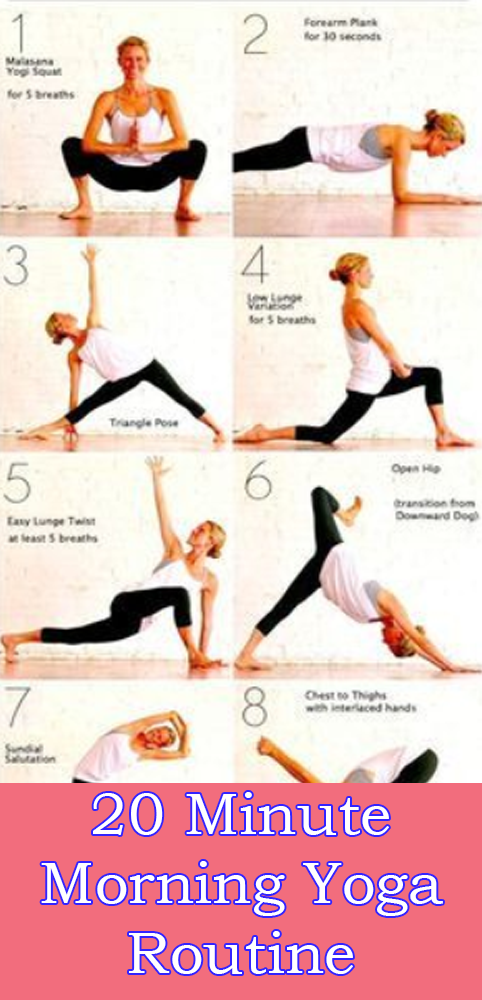
Yoga offers many great basic and advanced yoga poses that are beneficial to anyone who performs them. Most advanced yoga poses can be transitioned into from several preparatory sequences. Below, we will explore how to “flow” or transition into the following three advanced asanas or poses: Warrior I, Warrior II, Extended Triangle, and Half Moon.

Advanced Pose #1: Warrior I
There are actually three different versions of Warrior Pose beginning with Warrior I or Virabhadrasana I. Warrior I works on strengthening the legs and opening up the chest and shoulders. From this pose, you can transition into what is known as the Warrior II.
How to get into Warrior I:
- Begin this pose from Downward Facing Dog. Bring your right foot forward until it reaches your right hand.
- Turn your left foot using the ball of your foot and place your heel back on the floor. Your foot should now be turned at a 45-degree angle.
- Next, bend your right knee until your knee is directly over your right ankle. This should form a 90-degree angle (or a right angle) with your calf and your thigh.
- Push your right hip back and the left hip forward so that your hips are square.
- Bring your arms out to the side and raise them up until your palms meet above your head. Bend back slightly so that you’re looking up at your thumbs.
- Finally, let your shoulder blades slide down your back.
- Repeat on the opposite side.
From here, you can transition into Warrior II.

Advanced Pose #2: Warrior II
Warrior II or Virabhadrasana II naturally follows Warrior I. You will remain standing for this pose. Warrior II strengthens your arms and your legs, opens up your chest and shoulders, and also helps to tone your stomach.
How to get into Warrior II:
- Begin with Warrior I. Bring both arms down until they are out straight and parallel to the floor. Your right arm should be out in front of you (with your right leg in front) and your left arm should be behind you (with your left leg back).
- Rotate your left hip back. Make sure to keep your right knee bent and your right thigh parallel to the floor at a right angle.
- Pull your stomach in slightly. Your shoulders should be directly over your hips.
- Concentrate on extending through your hands all the way to the end of your fingertips and beyond.
- Your head should be turned so that you’re looking forward, gazing past your right hand.
- Your quads should be your foundation and your triceps should be supporting your arms.
- Repeat on the opposite side.
After you’re finished with Warrior II on both sides, you can transition into Extended Triangle Pose.

Advanced Pose #3: Extended Triangle Pose
Extended Triangle Pose is also known as Trikonasana. This pose is done while standing and strengthens all of the major muscles in the legs (including your hamstrings) and helps to relax and open up your chest and shoulders. This pose is also good for relieving back pain.
How to get into Extended Triangle Pose:
- Once you are in Warrior II, bring your front leg forward (in this case, we’ll use the right leg).
- Reach forward with your right arm. As you do this, draw the right thigh backward, tuck your right hip, and hinge at the waist.
- Next, extend your right arm and draw it down, placing it on your shin or on your right ankle. Do whichever one feels the most comfortable. You might even want to place your hand on the floor on either the inside or outside of your right foot.
- Your left shoulder should be directly above your right shoulder. Reach upward with your left hand through your fingertips. Don’t reach with your left shoulder; let your shoulder stay firmly in the socket.
- Turn your head toward your left hand and look up at your fingertips.
- Push your right thigh muscle back so that the crease in your right hip becomes deeper. Your left hip should be directly above your right hip.
- Repeat on the opposite side.
From Extended Triangle Pose you can transition into Half Moon.
Sources: caloriebee.com